BAF INSTALLATION INSTRUCTIONS
Site Preparation and Excavation Instructions O’Reilly Oakstown BAF Wastewater Treatment System.
- When choosing the location to dig, first consult your Site Specific Report as submitted to the planning authority. This will show the proposed location of the system and the design of the percolation area in detail. It will also note the presence of rock or a high water table, in which case a rock-breaker or water-pump can be organised in advance. It is important to observe the EPA Separation Guidelines as shown below. See table 1. These show the minimum distance the system and percolation area may be from the house etc.
- Ensure that there is a solid unimpeded access for the Oakstown truck back to the hole. Clear any build up of clay from around the hole to allow the truck to reverse to within one metre of the hole.
- In very wet conditions, it is best to leave the last few bucketfuls to be dug when the truck arrives. If the ground is rocky, it is advisable to dig the hole ahead of time to minimise delays on-site.
- Ensure there are no power lines or other hazards above the excavation site.
- We recommend an inspection chamber (AJ) be fitted just before the BAF Unit.

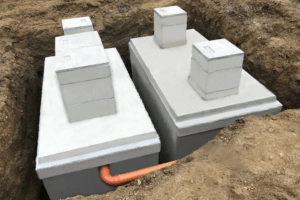
Generally the Oakstown BAF 2-Tank System is installed side by side as follows: See Diagram 1.
Dig a hole 3650mm (12ft) square. This comfortably accommodates both tanks and leaves space to fit the connecting pipes. The depth of the hole for the first tank is 1525mm (5ft) below the inlet pipe. The second tank sits 150mm (6inch) lower as shown in Diagram 2.
When fitting tanks in tandem, dig a hole 6700mm (22ft) long by 1825mm (6ft) wide. Again dig 1525mm (5ft) below the invert for the first tank and drop 100mm (4inch) for the second tank.
Although it is not essential, a bed of screenings will help to ensure a level surface for each tank.
When the tanks are dropped in by the Oakstown truck, a space of at least 400mm (16inch) must be left between them for the desludge pipe.
Before fitting the connecting pipe, backfill between and around the tanks with clay. Compact the clay underneath the connecting pipe with the digger bucket and cover the pipes with sand/gravel when fitted, to prevent the pipe sinking under pressure.
Please make sure that the final finished ground level is 75mm (3inch) below the top of the risers to prevent flooding of the electronic controls in exceptionally wet weather. If in doubt, we can hold off on commissioning the system until landscaping is finished and fit extra risers then if required.
Our driver will leave sufficient 7-Core Cable to reach the house. Our technician will commission the system by installing the air pump, water pump and electronic controls and wiring them at the system. He will leave the “internal panel” for connection by your electrician to the mains with the most senior person on site. If there is nobody on site, it will be left inside the “Green Box” on the system itself.
Refer to the relevant Site Specific Report for size and design of the percolation area. The following diagram gives a simple outline.
Please call O’Reilly Oakstown when moving in or when the system has been connected. Our technician will carry out a site visit to ensure the system has been wired, switched on and the risers are above the surrounding topsoil. A technician will visit the site to carry out a full service towards the end of the first year.